之前 我用树莓派挂载移动硬盘, 在上面部署 NextCloud, 然后使用 Cloudflare Tunnel 做内网穿透, 当作 NAS 使用. 但是 Cloudflare 在国内的访问速度实在太慢. 更糟糕的是, 最近一段时间, 我域名的 Cloudflare 节点突然在国内无法访问, 导致包括这个博客在内的所有服务 都无法正常使用. 于是我在前段时间在腾讯云买了一台香港的廉价 VPS, 做了一次服务迁移, 包括
在 VPS 上部署 frp , 使用它代替 Cloudflare Tunnel 做内网穿透 把博客搬到 VPS 上, 并使用 Github Action 做自动部署. 域名直接指向 VPS, 不使用 Cloudflare 代理 这篇文章记录我是怎么做的.
Let’s Encrypt 证书 由于不再使用 Cloudflare 代理, 也就无法使用 Cloudflare 的证书了, 我们必须自己解决证书的问题. 好在有 Let’s Encrypt , 它提供免费的 HTTPS 证书. Let’s Encrypt 证书的申请很简单, 基本上只需要证明你拥有这个域名就行了.
Let’s Encrypt 推荐使用 certbot 申请证书. 官网有非常详细的申请步骤指引. 对于我来说, 我需要申请一个通配符域名证书. 我的 DNS 服务商是 Cloudflare, certbot 对此有专门的支持, 一切就非常简单了. 首先安装 certbot, 先确保机器上没有安装老版本的 certbot:
certbot 使用 snapd 安装. snapd 是一个新的包管理系统, 某些方面要优于传统的 apt 和 yum. 如果机器上没有 snapd, 需要先安装它
1
2
sudo apt update
确保 snapd 更新到最新
1 sudo snap install core; sudo snap refresh core
接着用 snap 安装 certbot:
1
2
sudo snap install --classic certbotln -s /snap/bin/certbot /usr/bin/certbot
然后安装 Cloudflare DNS 的插件
1
2
sudo snap set certbot trust-plugin-with-root=ok
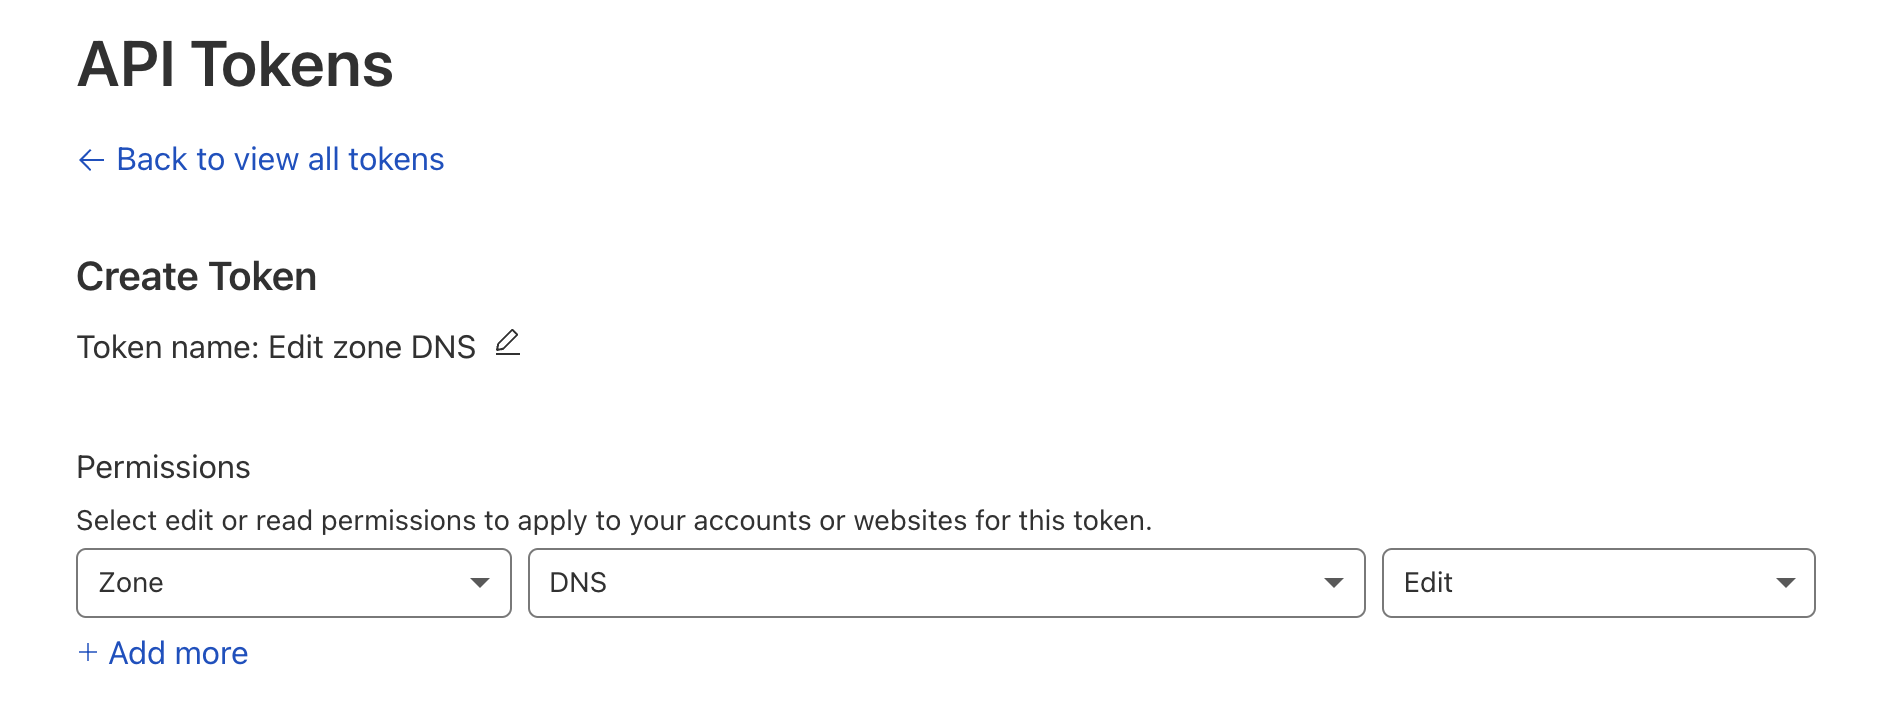
接着就是证明我拥有这个域名. 打开 Cloudflare 的控制台, 创建一个 API token 给 certbot 使用, 让它能够请求 Cloudflare 以验证域名的所有权. 这个 token 需要有 Zone:DNS:Edit 的权限.
token 接着创建一个配置文件 cloudflare.ini 指定这个 token:
1 dns_cloudflare_api_token = 0123456789 abcdef0123456789abcdef01234567
然后就可以创建证书了
1
2
3
4
5
sudo certbot certonly \'*.luyuhuang.tech' \'luyuhuang.tech'
证书会存放在在 /etc/letsencrypt/live/luyuhuang.tech/ 下. 证书文件为 /etc/letsencrypt/live/luyuhuang.tech/fullchain.pem, 私钥文件为 /etc/letsencrypt/live/luyuhuang.tech/privkey.pem. 执行 certbot certificates 会打印出证书的详细信息:
1
2
3
4
5
6
7
8
9
10
11
12
13
$ sudo certbot certificateslog to /var/log/letsencrypt/letsencrypt.log
以上只是我的操作步骤, 不同的环境做法可能不一样, 具体的步骤应当参照官网的操作指南.
接着我们配置一个 Nginx HTTPS 服务, 配置中指定证书和私钥的路径即可.
1
2
3
4
5
6
7
8
9
10
11
12
13
14
15
16
17
18
server {
证书的有效期不长, 因此需要及时检查更新. certbot 会自动创建一个定时任务来自动检查证书更新, 因此不需要我们手动操作. 我环境下的定时任务安装在 systemd 下:
1
2
3
$ sudo systemctl list-timers
不过更新完证书后, 需要让 Nginx 重新加载证书. 因此我们需要配置一个钩子, 在每次更新证书后, 都 reload nginx. 我的做法是在 /etc/letsencrypt/renewal-hooks/post 下创建一个脚本, 脚本中执行 nginx -s reload. 这个脚本要有可执行权限.
1
2
3
4
5
6
cd /etc/letsencrypt/renewal-hooks/postcat <<EOF > reload-nginx.sh #!/usr/bin/bash /data/nginx/sbin/nginx -s reload EOF chmod +x reload-nginx.sh
博客迁移到 VPS 我的博客是静态网站, 迁移起来比较容易. git clone 仓库后, 用 Jekyll 构建一下网站:
1
2
3
4
git clone https://github.com/luyuhuang/luyuhuang.github.io.gitcd luyuhuang.github.ioexec jekyll build
然后让 Nginx 指向网站目录即可
1
2
3
4
5
6
7
8
9
10
11
12
server {
我希望做到每次有 Git 提交, VPS 就会自动更新并构建网站. 我写了一个简单的 Python 脚本开启一个 HTTP 服务, 每当收到 POST 请求, 就会执行更新构建命令. 这里我特意使用 POST 而不是 GET, 因为这是一个非幂等的操作. 它会将命令的输出作为内容返回, 如果执行失败, 状态码会返回 500.
1
2
3
4
5
6
7
8
9
10
11
12
13
14
15
16
import subprocessfrom http.server import HTTPServer, BaseHTTPRequestHandlerclass Handler (BaseHTTPRequestHandler ):def do_POST (self ):"cd /data/luyuhuang.github.io && git pull && bundle && JEKYLL_ENV=production bundle exec jekyll build" "bash" , "-c" , cmd], stdout=subprocess.PIPE, stderr=subprocess.STDOUT)200 if res.returncode == 0 else 500 "Content-Length" , len (content))"127.0.0.1" , 8080 ), Handler).serve_forever()
这个脚本监听 127.0.0.1:8080, 然后让 Nginx 将 /build 路径 proxy 到这个端口.
1
2
3
4
5
location = /build {
当然, 访问控制少不了. 这里使用了 HTTP 基础认证, 读取 htpasswd 密码文件 passwd. 使用 htpasswd 命令创建密码文件
1
2
3
$ htpasswd -c passwd githubtype new password: ******
这样只需要使用正确的账号密码请求 https://luyuhuang.tech/build 就可以触发构建了. 接下来就只需要创建一个 Github Action:
1
2
3
4
5
6
7
8
9
10
11
12
13
14
15
name: Build on: push: branches: [ master ]jobs: build: runs-on: ubuntu-latest steps: - env: BUILD_PASSWORD: ${{ secrets.BUILD_PASSWORD }} run: | code=$(curl --silent --output /dev/stderr --write-out "%{http_code}" -u "github:$BUILD_PASSWORD" -X POST 'https://luyuhuang.tech/build') test "$code" -eq 200
这个 Action 会在每次提交时执行, 用 curl POST 请求构建地址. 这里指定 --output /dev/stderr 将内容输出到 stderr, 这样内容可以在终端看到; 然后指定 --write-out "%{http_code}" 将 HTTP 状态码打印到 stdin 并捕获到变量 $code 中. 如果 $code 不为 200, test 会返回非 0 值, Action 就会失败.
使用 frp 做内网穿透 frp 是目前比较流行的内网穿透工具. 我需要利用它将 https://home.luyuhuang.tech 内网穿透到树莓派上. 不过 VPS 上的 Nginx 已经占用了 443 端口, 我们不能让 frp 直接对 443 端口做转发. 我的做法是让 Nginx 将 home.luyuhuang.tech 的 HTTPS 请求 proxy 转发给 frp 服务端, frp 服务端再转发到树莓派上的 frp 客户端.
frp 的服务端配置非常简单, 做好访问控制就行. 这里绑定端口 7000, 让 frp 客户端通过这个端口与服务器连接. token 与客户端约定好, 必须一致才能连接. allow_ports 只允许客户端开启 8000 端口的转发.
1
2
3
4
[common] bind_port = 7000 token = 0123456789 abcdef0123456789abcdef01234567allow_ports = 8000
我们再在树莓派上配置 frp 客户端. 客户端需要指定服务器的地址和端口, 约定的 token. 客户端创建一个名为 raspberry 的端口转发, 将服务器 8000 端口转发到树莓派的 8080 端口. 8080 端口为 NextCloud 的 Docker 监听的端口.
1
2
3
4
5
6
7
8
9
10
11
12
[common] server_addr = 43.123 .321.123 server_port = 7000 token = 0123456789 abcdef0123456789abcdef01234567[raspberry] type = tcpuse_encryption = true local_ip = 127.0 .0.1 local_port = 8080 remote_port = 8000
此时已经能在 VPS 使用 8000 端口访问到树莓派的 NextCloud 了
1
2
3
4
5
6
7
8
9
10
11
12
13
$ curl -v http://127.0.0.1:8000set
最后我们再配置 Nginx, 将 home.luyuhuang.tech 的 HTTPS 请求 proxy 到 http://127.0.0.1:8000
1
2
3
4
5
6
7
8
9
10
server {
这里 frp 转发的是明文的 HTTP 协议, 不过 frp 隧道本身开启了加密, 所有没有问题.
VPS 上 frp 服务器开启的 8000 端口是监听在 0.0.0.0 上的, 为了阻止对它的直接访问, 应当开启防火墙.
总结 最后整个服务的架构图是这样的:
struct